This week’s blog post will cover some tips and trix for the prism layer mesher in Simcenter STAR-CCM+. Mainly how to tune the properties and settings for the prism layer mesher aside from simply reducing the base size of the mesher operation. We will work from the notion that base size and other sizes are set in the default controls and should not be changed. We will fail in creating prism layers in a tight spot. We will go over the settings, what they mean, how we can change them, and how we can get them to work together, where individual tuning is not enough.
The case
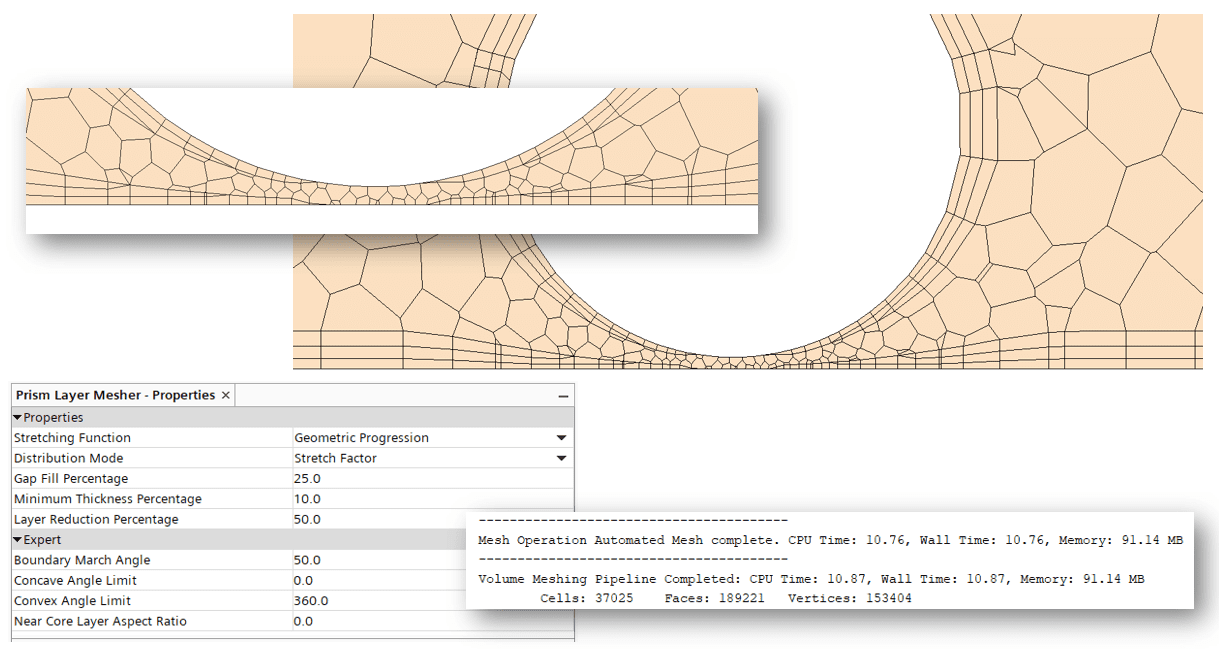
A simple block with a cylinder going through it, the distance between the bottom floor and the cylinder is small, both in terms of base size, and as far as absolute values are considered. The below picture shows our attempt to get layers on both the floor and on the cylinder using the default settings for the prism layers mesher. Note that we aim for three layers with a growth of 1.2. And as we can see, the prism layer mesher fails to create layers. Let us consider the; Gap fill percentage, minimum thickness percentage and Layer reduction percentage settings, first individually, then together and see if we cannot solve this without too much effort.
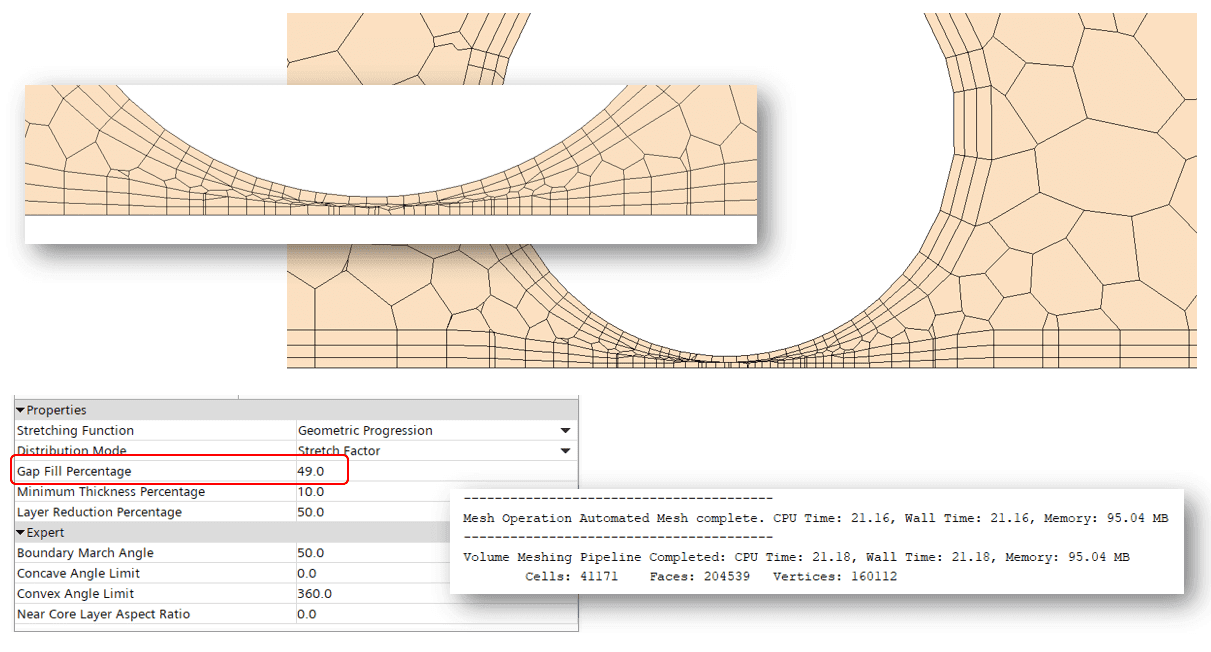
Gap fill percentage
This setting is described in the GUI as: “Specifies the percentage of the distance between close surfaces that the prism layer mesher fills with prism cells”. It can be specified between 0 and 50%, the upper value needs to be <50 and the lower value >0. What this in practise means is that you specify, from the perspective of a gap, how much do we allow the prism layers to fill up said gap. And the value of 50% means from each side of the gap. We can maximally allow the prisms built from one side to cover 50%, since we also allow the prism layers from the other side to cover 50%. So, the total coverage can be allowed to be just below 100%. But you can imagine what will happen to the bulk string that is left. And if you cannot imagine this, see the below picture. In the example we allow for the value to be at 49%, meaning that we can expect, in a tight spot like this, the remaining bulk mesh, only to be 2% of the total height. And, as expected this puts a strain on the mesh quality, since we still only allow for the same smallest sizes in terms of surface mesh. The default value is 25% to allow for a gap to be filled with a total of half prism layers and half bulk mesh. So, in conclusion, we maintain 1 prism layer on each side, but at the expense of compromised mesh quality.
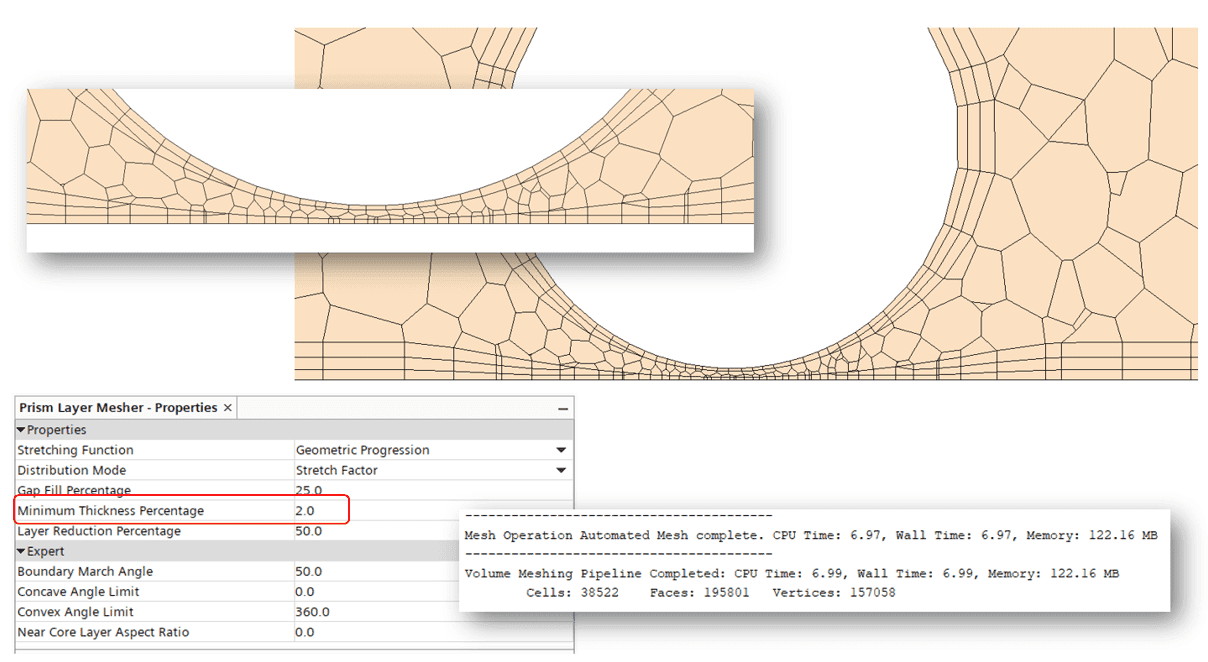
Minimum thickness percentage
The setting is described in the GUI as: “Retracts the cell layers to zero when the prism layer total thickness is below this value”. This means basically that this is the setting that allow for a total collapse of the prism layers when the value for the prism layers go below. The default value is 10%, but it can be specified from 1e-2 to 100%. The 10% value then means that we remove all prism layers if the prism layer mesher calculates a value that is below 10% of total prism layer thickness. If we change this value to 2% we can see the result in the pictures below. The mesh quality is still decent, and this change for our different settings gives the best stand-alone result as it still maintains 1 prism layer and produce ok bulk cells. But as you can see, the setting only considers total prism layer thickness regardless of number of layers left.
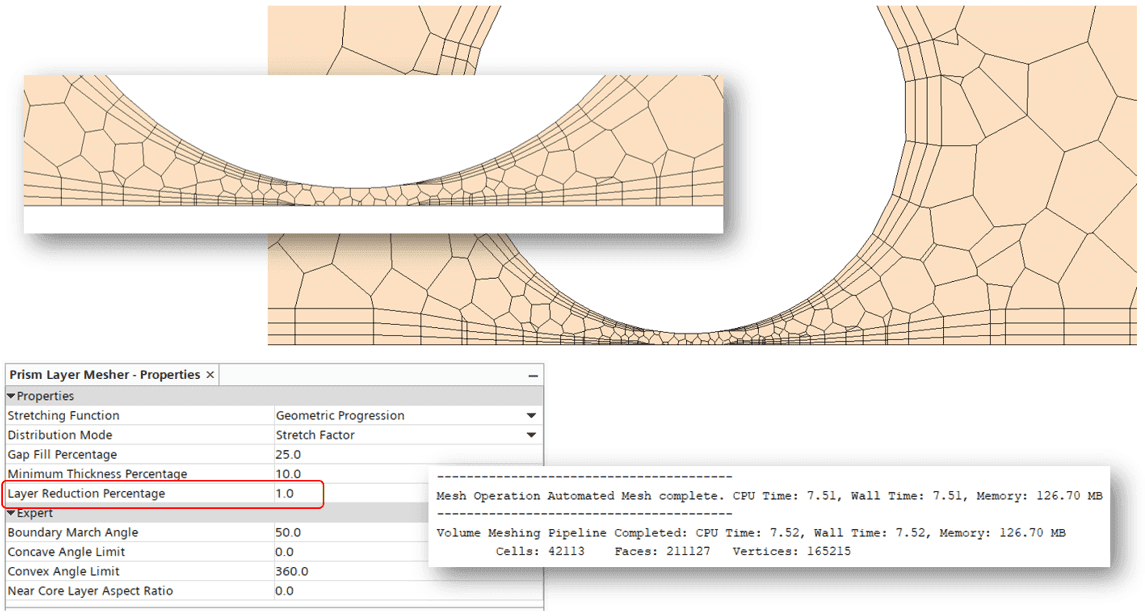
Layer reduction percentage
The layer reduction percentage is described in the GUI as: “Removes cell layers when the prism layer total thickness is below this value”. Meaning that it removes layers, one at the time, as many as requires to fulfil the settings in reference to total prism layer height. In the example below we, go as low as 1%, but still the layers are collapsed since the total height also relates to the minimum thickness percentage.
All of them
This means that the settings both work with and against each other, and it is important to understand that we might need to change all of them to maintain our three prism layers and some mesh quality on what is left for the polyhedral mesher. So, if we carefully alter them, allow for slightly more of the gap to be covered by prism layers (Gap fill percentage, from 25 to 30), change the minimum thickness percentage from 10 to 5 %, allowing our total prism layer thickness to be smaller than the default setting, and also lower the layer reduction percentage from 50 to 12 %, telling the mesher not to collapse our layers, but allowing each individual layer to much smaller. We can get a result with 3 prism layers maintained, and still decent quality bulk polyhedral cells.
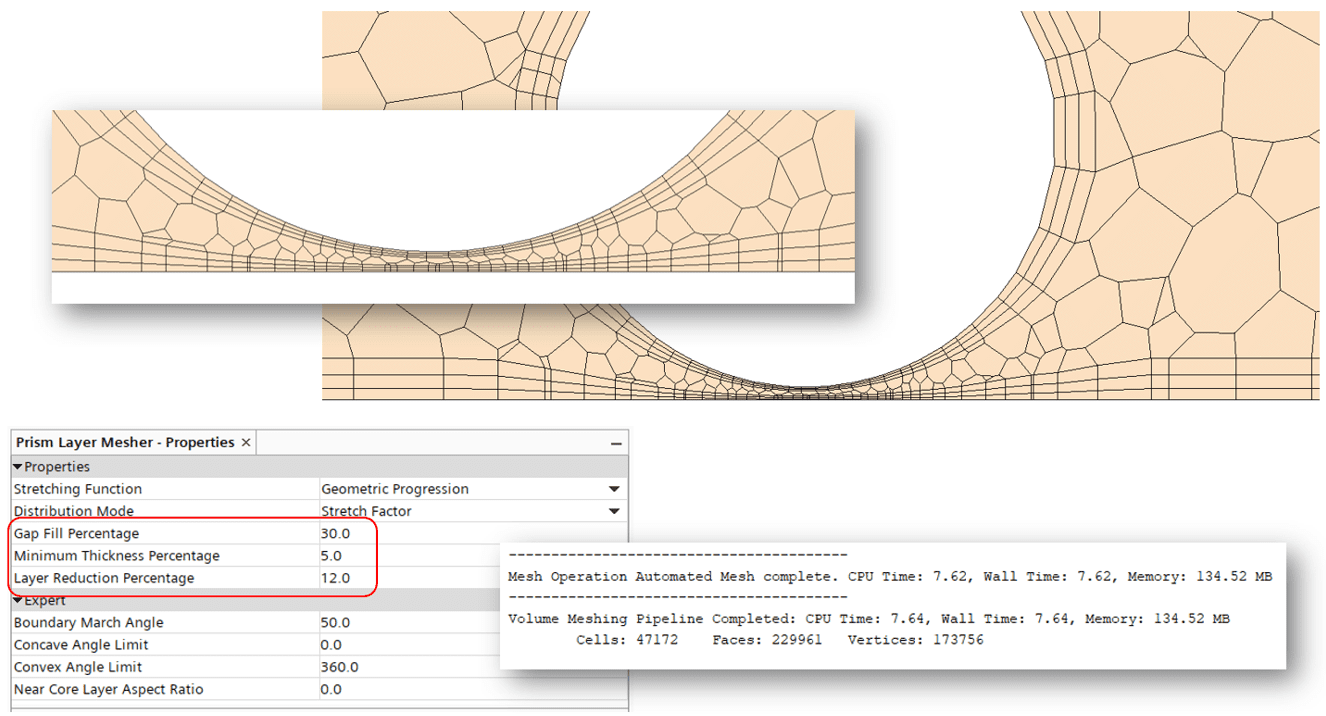
Also note the times for the meshing-procedures. Trying to force something that is not natural in some sense, has a large bearing on the meshing-time. If you allow settings that will create something smooth and dynamic in the end, the meshing-procedure is faster. If you try to force the mesher into violating its conditions (like with the Gap fill percentage example) you might end up in longer meshing times. An unfortunate consequence since you likely will have to remesh anyway.
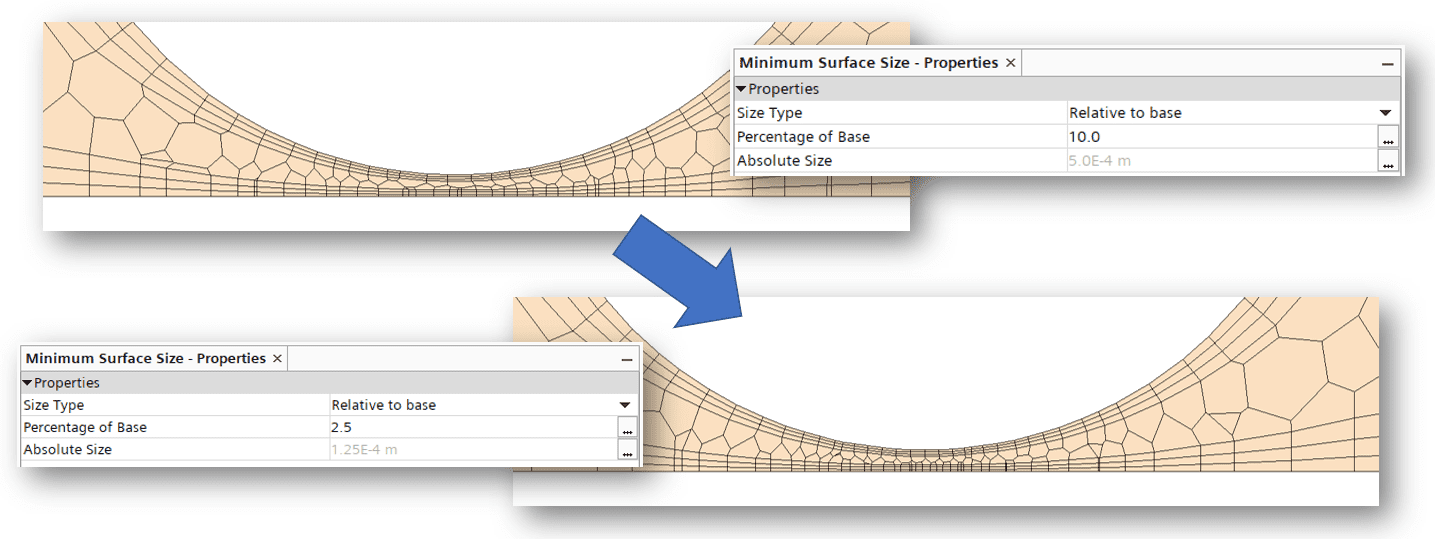
The best result will of course be when you combine the tuning of these settings with other settings relevant for mesh-size. In the below picture we compare out previously best effort to simply reducing the minimum surface size from default of 10% to 2.5%. Leaving us with less elongated cells in the tightest spot. At some expense of course with a slightly higher mesh count.
I hope this has been useful. Remember that it is good once and a while to go over the settings for the different meshers and solver in the software to understand what they do, and especially how to manipulate them in your favour. As usual, reach out to support@volupe.com with all and any question. We at Volupe wish you a happy Easter.
Author

Robin Victor
+46731473121
support@volupe.com